This project is one that makes me feel on top of the world but also possibly one of my most craziest IoT projects. I am fascinated with IoT and the point where software interacts with my physical world for example in the simplest form, a sensor programmed to turn a light bulb on when there is motion. I get huge joy from tinkering and exploring how things work but the real satisfaction comes from combining connected sensors, data, automation and machine learning and of course learning myself. This project was no exception.
We’ve all most likely been into a public restroom somewhere and had the automatic air freshener trigger and possibly even make us jump out of our skin when it does. These units typically run on a schedule and spray some kind of air freshener into the room. Some are even a little smarter and trigger when there is motion in the room. Well I have a number of air fresheners like these in the house and sure they’re not necessary but I like them and they smell nice. What I don’t like is how they continue to work when I’m not in the room and even not in the house. This is entirely wasteful and not very smart. And well my house is smart so get with the programme! The other problem is if you’re like me and find it hard to sleep sometimes the noise of them spraying throughout the night is annoying and likely lead to me saying to myself was trying to get to sleep “I wonder if I can make these things smart“. I’ve likely fallen asleep as this stage and forgotten about the crazy idea, but clearly this one time I didn’t, so here I am writing about how to IoT Airwick air fresheners. Let’s consider a smart air freshener and how it would work if it wasn’t triggered by a manually.
Motion. Rooms can be busy so triggering with each motion event would as wasteful as it spraying every 15 minutes now. But we could use motion in combination with when the air freshener last sprayed to ensure it only sprays every 30 minutes for example.
Alarm state. If my house alarm is armed then that is a good sign I’m not home so the air fresheners shouldn’t work. This could also prevent them from working when in night mode but there is, of course, one the exception to that, the bathroom!
Room based triggers. In the living room, if the TV is on or the sofa is occupied then the room is in-use. In the office, if my workstation is unlocked then I am likely working and the room is in-use. If my toilet is flushed and the bath or shower is in-use then that is a great indication the bathroom is in use. And yes, I’ve IoT’ed my toilet! Then there are exceptions like if I’m having a bath I probably don’t want it to be triggered as it would mess with my Zen.
Spray interval. The unit provides some control over the frequency the air freshener sprays but this is limited to 9, 18 and 36-minute intervals. Why these intervals I don’t know but I’m sure Airwick have their reason. It would be useful to replicate this and allow longer intervals between sprays.
Sensors. Throughout my house, I have a large collection of sensors and in a truly connected world, these should be considered too. For example, when the alarm is unarmed after a trip away the air fresheners could be sprayed to create a welcoming smell. If windows are open then I’d rather have the fresh air than the air freshener so don’t have them spray.
Voice. In an inclusive world, voice assistants are increasingly used to perform tasks that ordinarily might have been out of reach for some people.
So considering all of the above I decided to accept the challenge and IoT’ed my air fresheners. But with all these crazy ideas – I wasn’t going to compromise on the aesthetics. The look and feel could not be compromised. Let me walk you through it.
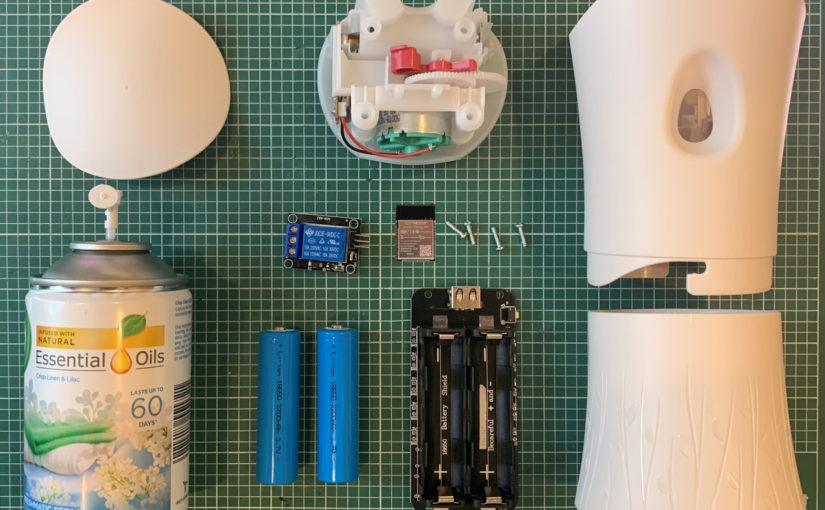
Ingredients:
- Airwick air freshener
- ESP32 / ESP8266
- 5V Relay
- Battery shield and 18650 batteries
- ESPHome
- Home Assistant

Airwick Air Freshener
The Airwick air freshener device is pretty discrete. It contains a can of the air freshener of your choosing and two AA batteries. Behind the scenes, there is a 3v motor which when powered, powers gearing that creates sufficient force to push down the nozzle on the can of air freshener. Notice the red plunger gear is only two-thirds round. This prevents the gearing from forcing the aerosol can to spray continuously and it runs out of gear. When the motor is no longer powered the gearing reverses from the return force of the nozzle of the can of compressed air freshener.

The build
This was quick to build out and I had a working air freshener activated through my NodeMcu in about 15 minutes.

I planned to use a smaller ESP32 dev board but for this prototype, I’ve opted to use the standard board for ease of access. I made a few alterations to the plastic insert in order for me to place the components inside.

I also planned to use larger batteries but will need to 3d print a housing for that so for this prototype I housed the battery discretely on the back for ease of access and space reasons.

ESPHome
In order to operate my air freshener automatically, I need something that I can programmatically control from Home Assistant. To provide me with the compute for this IoT project I turned to my trusted and favourite ESP32 NodeMcu board flashed with ESPHome. The ESP32 NodeMcu is powered from a battery and is connected to a relay. This relay allows a circuit to open and closes which then activates the motor and gearing inside the air freshener.

In 10 lines of configuration, I was able to create a switch that operates that relay and that’s it. It is as simple as that. To turn the switch on and off you need an interface. ESPHome provides the ability to do this through a web UI, MQTT or in my case through integration with Home Assistant. In fact, Home Assistant auto-discovers ESPHome devices so the switch I defined in my configuration is immediately available to use.
To preserve the battery I decided to use the deep sleep and MQTT component in ESPHome. This allows me to wake the device, check the state of a MQTT topic. It then either triggers the air freshener or goes back to sleep depending on the state of that MQTT topic and save battery power.
Home Assistant
The brain of my house Home Assistant handles all the integration with ESPHome, other sensors and the home automation logic.

I won’t go through all of the different automations I have created to work with my new-fangled smart IoT air fresheners but instead, I’ll show you an example that in part is the most applicable for an air freshener. My bathroom air freshener. That particular air freshener is triggered when my IoT toilet is flushed and as automations go is the coolest toilet air freshener automation you will likely to ever see!
For me, the data is as much fun to play with and analyse as the tinkering with all the hardware. To provide me with additional data points that I can study, I added a counter that increments each time the unit is sprayed and a date sensor to store when the air freshener was last replaced.
To preserve battery life the ESP board goes into a deep sleep and wakes every few minutes to check if it needs to trigger the air freshener. This is achieved using an MQTT topic. I created an MQTT switch that is enabled when a binary sensor is on. This switch triggers the air freshener to spray and is reset before ESPHome sends the device to sleep again.
Alexa – beast-mode level five-thousand!!!
We all know there can be those moments when a little fresh air is most welcome. For those situations, I’ll leave you with this.
Alexa, it’s stinky.
This uses a custom component for Home Assistant called alexa_media_player. An Alexa routine is created to listen for that sentence which then set the brightness level of a virtual light created in Home Assistant to a particular level. Then an automation in Home Assistant is triggered. It checks which room Alexa was used in and then activates the air freshener a few times in that room.
One thing I have noticed with Alexa routines is that I’ve always had to keep the wake sentences short and not complex in order for them to be picked up by Alexa. For example, for this I started with “Alexa, it is stinky in here” but her response would be “Sorry, I don’t know that one”. Instead, I simplified the wake sentence to “Alexa, it’s stinky and “Alexa, it smells”. This could be taken a step further and a routine could be used to activate all the air fresheners like “Alexa, freshen up the house” for those moments when you have someone special coming over!

Closing thoughts
This really could not have been made any easier and that is down to two great projects Home Assistant and ESPHome. I strongly recommend that if you haven’t explored Home Assistant, ESPHome or ESP32 NodeMcu for tinkering you give them a try.

I started by saying I would not compromise on the look and feel of the unit and hopefully the above demonstrates this. There are other benefits to this madness. My friends won’t freak out from the sound of the air freshener spraying nor think I think they smell! The air freshener will last longer and because I converted the batteries I can recharge them. I’ll be able to work out when the spray needs replacing from the data. Oh and I’ll be able to get off to sleep without hearing that clicking noise and troubling myself with such crazy ideas like this. For now at least!
So while I’ve made a few jokes in this article and had lots of fun along the way, the point I want you to take away is that ideas can become reality. Crazy to you might not be crazy to someone else. Let your mind run away and be creative. The growth and learning opportunities are endless.
I 💕 my Home Assistant


