Category: SharePoint 2013

  • Event Receiver to Remove “Recent” from SP2013 Quick Launch

    Event Receiver to Remove “Recent” from SP2013 Quick Launch

    I’m sure removing the Recent heading from the Quick Launch in SharePoint 2013 has been talked about a million times over since SharePoint 2013 was launched. It’s been solved in this way and that way, by hand, with javascript and programmatically. In this post, I share the code to remove the heading with the ListAdded event receiver.

    With and without the Recent heading on the Quick Launch navigation.
    With and without the Recent heading on the Quick Launch navigation.

    Event receiver code

    It’s based on code provided as an answered on the SharePoint StackExchange website by Remko van Laarhoven. I’ve then wrapped in a list added event receiver so that it is executed each time a new list or library is added. As the list/library is then not available on the Quick Launch I’ve added a couple of lines to then show it.

    Update (22nd June 2014): since creating this solution I have since discovered that the Recent heading still is created even with the event receiver triggering when lists/libraries created from templates. I resolved this by adding a sleep before the code to remove the heading is executed.
    [code language="c"]
    System.Threading.Thread.Sleep(1500);
    This in conjunction with the jQuery method prevent users from ever seeing the Recent Heading whether they are viewing the page or editing the links on the page.
    [code language="js"]
    // Hide Recent on Quick Launch
    $("#ctl00_PlaceHolderLeftNavBar_QuickLaunchNavigationManager .ms-core-listMenu-root li:contains('Recent')").children().remove();
    $("#ctl00_PlaceHolderLeftNavBar_QuickLaunchNavigationManager .ms-core-listMenu-item:contains('Recent')").remove();
    [code language="c"]
    public class ListAddedEventReceiver : SPListEventReceiver
    {
    public override void ListAdded(SPListEventProperties properties)
    {
    base.ListAdded(properties);
    SPWeb web = properties.Web;
    if (web != null)
    {
    //Sleep
    System.Threading.Thread.Sleep(1500);

    //Remove heading
    var title = SPUtility.GetLocalizedString("$Resources:core,category_Recent", null, web.Language);
    SPNavigationNodeCollection nodes = web.Navigation.QuickLaunch;
    foreach (SPNavigationNode node in nodes)
    {
    if (node.Title.ToLower().Equals(title.ToLower()))
    {
    // Delete the recent heading node
    node.Delete();
    break;
    }
    }
    // Show list on the quick launch
    SPList list = web.Lists[properties.ListId];
    list.OnQuickLaunch = true;
    list.Update();
    }
    }
    }

    Download Remove Recent Heading Solution

    For those who don’t want to create the event receiver themselves in Visual Studio or don’t know how to, I have a packaged the solution so that you can deploy the WSP to your environment. For those who don’t know how to use this code, I will write a post explaining how to create this event receiver using Visual Studio from an IT Pros perspective very soon.

    jcallaghan.removerecentheading.wsp

    As with anything you download from the internet remember to review, rename and test this code/solution before using it in a production environment.
  • The Deployment Guide of all SharePoint 2013 Deployment Guides

    The Deployment Guide of all SharePoint 2013 Deployment Guides

    Let me introduce you to the Deployment guide for Microsoft SharePoint 2013. Anyone deploying, installing or configuring SharePoint 2013 absolutely must read this!

    This particular Deployment Guide is 674 pages long and like no other. It was published by the Microsoft Office System and Servers Team at Microsoft back in October 2012.

    It is such a great guide and is packed full of information. Reading through the deployment guide, I discovered some neat little tricks and refreshed myself on some pretty important best practices which are always a good exercise.

    Download it now, get reading and share it!

  • Working with SharePoint’s Second Stage Recycle Bin in PowerShell

    Working with SharePoint’s Second Stage Recycle Bin in PowerShell

    I thought I’d share a PowerShell script that I’ve created to perform a few tasks against a Site Collection Second Stage Recycle Bin (SSRB) in SharePoint.

    Remove-SecondStageRecycleBinItems.ps1
    Remove-SecondStageRecycleBinItems.ps1

    The requirement was to delete items that were older than a set number of days from the Second Stage Recycle Bin (SSRB). A record of each item deleted also needed to be added to a report.  But SharePoint can do this already I hear you say…well yes if a Site Collection quotas and the auditing features are used. In this scenario neither could be.

    To display items in the Second State Recycle Bin in a table I used this command.

    $site.Recyclebin | where { $_.ItemState -eq "SecondStageRecycleBin" -and $_.deleteddate -le $dateDiff} | Format-Table -Property Title, Web, DeletedBy, DeletedDate -Autosize -Wrap

    Then to remove each item from the Recycle Bin I used the delete command.

    $site.Recyclebin.Delete($_.ID)

    The full script is shared below. Remember to review, rename and test this script before using it in a production environment.

    One quirk I found while creating the script was that through the web browser, SharePoint reported the time each file was deleted correctly whereas, in PowerShell, the time was not honouring GMT summer time.

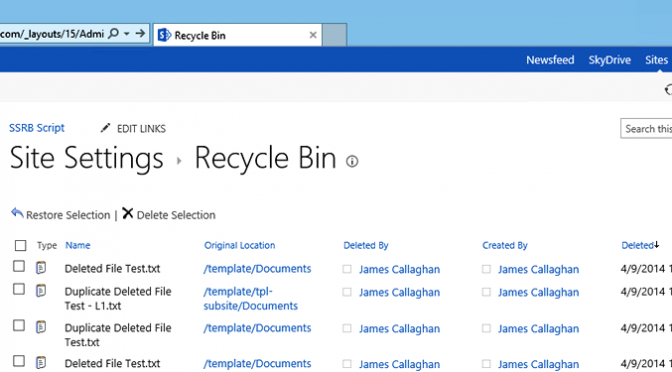
    British Summer Time  in SharePoint vs. PowerShell
    British Summer Time in SharePoint vs. PowerShell

    Enjoy and delete carefully!

  • Some light reading after the SharePoint Conference

    Some light reading after the SharePoint Conference

    I’ve managed to pickup some reading materials while in America that are going to keep me busy for some weeks.

    Microsoft SharePoint 2013 Administration

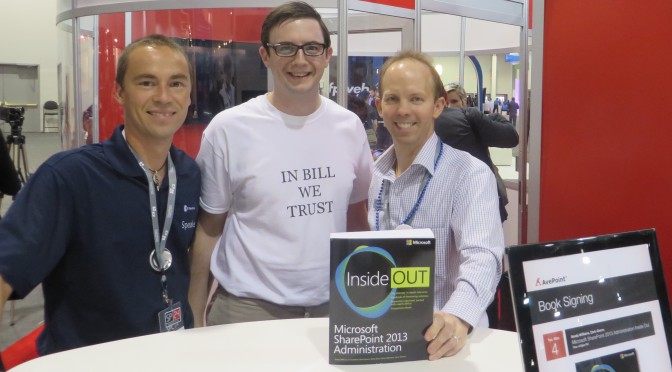
    First up was a book (Microsoft SharePoint 2013 Administration) I picked up at the AvePoint during a book signing during the SharePoint Conference.

    Two of the Authors Randy Williams and Chris Givens kindly signed it for me – it was really great to meet these two authors after many years of reading their books.

    Authors Randy Williams and Chris Givens at AvePoint book signing.
    Authors Randy Williams and Chris Givens at AvePoint book signing.

    Alcatraz 1259

    Second up was a book (Alcatraz 1259) from Alcatraz Island signed by the author Willam G. Baker himself who happened to be there just after finishing his parole aged 81. He is one of the last living cons who served in US Penitentiary Alcatraz and shares his account of life there in the book.

    Alcatraz 1259 author William G. Baker during book signing.
    Alcatraz 1259 author William G. Baker during book signing.

    I hadn’t appreciated the history of the Island, the Penitentiary or the prisoners and guards up until the audio tour. Up until this point I had just seen it as a prison in America that featured in the movie The Rock but the Island has a fascinating past – one that I am looking forward to learning more and more about.

    I’ve struggled to put Bill’s account of life on the Island down since we brought it – once done I’m going to find a guards account of life on the Island among others.

    MCSA Windows Server 2012 exams

    During the SharePoint Conference, I took the opportunity to update my Microsoft Certifications – more about that another day.

    To complete the Microsoft Certified Solutions Expert (MCSE) in SharePoint I have to pass 70-410, 70-411 and 70-412 also making me a Microsoft Certified Solutions Associate (MCSA) in Windows Server 2012.

    MCSA Windows Server 2012 reading
    MCSA Windows Server 2012 reading

    Happy reading I guess.

  • Error when creating new Site Collections via Central Administration

    Error when creating new Site Collections via Central Administration

    A customer recently reported that they were not able to create any new Site Collections within any Web Application in their SharePoint 2013 UAT environment. Instead of being able to create a new Site Collection they repeatedly received the error shown in the image below.

    Provider must implement the class 'System.Web.Security.MembershipProvider'.
    Provider must implement the class ‘System.Web.Security.MembershipProvider’.

    I in order to troubleshoot this issue I tried creating a Site Collection myself while monitoring the ULS logs. An event with an ID of 8307 was appearing in the logs each time I tried to create a new Site Collection. This event had a message of “An exception occurred in Forms claim provider when calling SPClaimProvider.FillResolve(): Provider must implement the class ‘System.Web.Security.MembershipProvider’. (C:\inetpub\wwwroot\wss\VirtualDirectories\34596\web.config line 606)”.

    ULS Viewer
    ULS Viewer
    Event 8307. SharePoint Foundation. Claims Authentication.
    Event 8307, SharePoint Foundation, Claims Authentication.

    This suggested a problem with the web.config for the Central Administration Web Application and an error with a Membership provider. Forms Based Authentication (FBA) has been used to configure FBA in this environment so I continued exploring this avenue further.

    I reviewed the web.config at the line indicated from the event and noticed that there were multiple entries for FBA membership and role providers. I removed these duplicate entries and was able to create Site Collections without any problems then.

    As the Forms Based Authentication in this environment was configured using the FBA Configuration Manager I can only think that this was at fault somehow – the odd thing is that the same tool was also used on to configure the production environment which I also confirmed was not also having the same issue.

    I would suggest that after using the FBA Configuration Manager to configure FBA that you ensure you can create new Site Collections. It’s certainly something I am going to be including to my deployment checklist!

  • Easily add jQuery tabs using the “Reusable Content” feature

    Easily add jQuery tabs using the “Reusable Content” feature

    This post is quite a fun one. Whilst I was working with a customer today someone came up to me and asked if it was possible to add tabs to their content pages to which I gave it a few seconds thought and I responded “sure that’s absolutely possible – leave it with me!”.

    I then spent my commute home thinking about how tabs could be delivered for end-users to make use of without them having to meddle around with any code. Sure getting tabs to work in SharePoint is pretty straight forward and is something we’ve all done at least on a couple of occasions but I give more thought about making it easier for the end-users to consume rather than just meeting the customer’s requirement by putting in a solution that isn’t pretty nor easy to use.

    Solution

    I eventually decided to use, what I thought was a very simple approach to giving users the option to use tabs. My solution makes use of the tabs from the jQuery UI (http://jqueryui.com/tabs/) library. It starts with a small modification to the master page that is currently being used. The following code should be added before the closing </head> tag.

    <link href="http://code.jquery.com/ui/1.10.3/themes/smoothness/jquery-ui.css" rel="stylesheet" />
    <script type="text/javascript" src="http://code.jquery.com/jquery-1.9.1.js"></script>
    <script type="text/javascript" src="http://code.jquery.com/ui/1.10.3/jquery-ui.js"></script>
    <script type="text/javascript">
    // <![CDATA[
    $(function() {
    $("#tabs").tabs();
    });
    // ]]>
    </script>

    I then added the following to the “Reusable Content” list in the root site of the Site Collection where I was adding tabs. Make sure that the “Automatic Update” is unchecked for this piece of reusable content.

    Reusable Content item
    Reusable Content item
    Reusable Content Lists
    Reusable Content Lists

    Below is the code that should be added to the Reusable HTML field.

    <div id="tabs">
    <ul>
    <li><a href="#tabs-1">Overtype tab 1 title here</a></li>
    <li><a href="#tabs-2">Overtype tab 2 title here</a></li>
    <li><a href="#tabs-3">Overtype tab 3 title here</a></li>
    </ul>
    <div id="tabs-1">Overtype tab 1 content here.</div>
    <div id="tabs-2">Overtype tab 2 content here.</div>
    <div id="tabs-3">Overtype tab 3 content here.</div>
    </div>

    To add the tabs onto a content page you can simply select the item that has just been added to “Reusable Content” list by clicking on the “Insert” tab whilst editing the page and expanding the “Resumable Content” menu.

    Reusable Content menu
    Reusable Content menu

    Rich text that represents the HTML markup for the tabs is then added onto the page. Each tab is represented by a bullet list item “<li>” and a content area “<div>”. The names of tabs you require can then be added by carefully overtyping the existing tab names. You must be careful not to introduce or remove any markup as this might prevent the tabs from working correctly.

    Once you have entered the names of the tabs you can then add the appropriate content by overtyping the content that you wish to include in that tab. This content can consist of rich text such as tables, images and also web parts. Again you must be careful not to introduce or remove any markup. Any tabs that are no longer required can be carefully removed by deleting the bullet list item and content area.

    Tabs demonstration
    Tabs demonstration

    There are other ways to achieve the same result but I thought this was a simple approach using out-of-the-box functionality. Happy tabbing!

     
  • Install standalone OneDrive for Business (formally SkyDrive Pro)

    Install standalone OneDrive for Business (formally SkyDrive Pro)

    Ok, so this has bothered me for some time – until now, there has been standalone OneDrive for Business SkyDrive Pro client. Users have had to install Office 2013 to experience the new way of synchronising files with SharePoint.

    The reason it has bothered me is that it is such a limitation to require the client to be installed in this way. For most organisations, it is just not feasible to install the latest and greatest software from day one due to budgets and wider IT constraints, resources and policies where software has to be tested, licensed and patched for example.

    Let’s put that aside now as I’m really happy to see that Microsoft released a standalone installer for the OneDrive for Business SkyDrive Pro client earlier this week.

    Download

    The standalone OneDrive for Business client is available on the Microsoft Downloads site. Both 32-bit and 64-bit versions of the client are available.

    The client can also be installed alongside previous versions of Office and can be used to synchronise libraries from SharePoint 2010, SharePoint 2013 and SharePoint Online in Office 365.

  • Determining the version of your SharePoint Online servers

    Determining the version of your SharePoint Online servers

    If you need to check what version of SharePoint server your Office 365 tenant is running especially during the Office 365 and SharePoint Online service upgrade (aside from checking through the Admin Portal via https://portal.microsoftonline.com) then you can add the following /_vti_pvt/service.cnf to the end of your SharePoint site – as shown below.

    https://jcallaghan.sharepoint.com/_vti_pvt/service.cnf

    The page will output two lines of text from which we can determine the version of the SharePoint servers. If the second row starts with 14 then you are running SharePoint 2010, if it starts with 15 then you are running SharePoint 2013.

    /_vti_pvt/service.cnf output displayed
    /_vti_pvt/service.cnf output displayed

    SharePoint Online on SharePoint 2010 servers:

    vti_encoding:SR|utf8-nl
    vti_extenderversion:SR|14.0.0.6120

    SharePoint Online on SharePoint 2013 servers:

    vti_encoding:SR|utf8-nl
    vti_extenderversion:SR|15.0.0.4454

    After the service upgrade, you may be running SharePoint 2010 on SharePoint 2013 servers (technically known as 14 mode) until you upgrade your site collections to SharePoint 2013 (15 mode).

  • Embed code in a SharePoint 2013 web part page

    Embed code in a SharePoint 2013 web part page

    A quick post here to share a new feature in SharePoint 2013 that enables you to easily embed code such as javascript and CSS into the content area of a web part page for example.

    Insert action to embed code
    Insert action to embed code

    Previously we did this by editing the page source or by creating lots of text files and linked them using the “Content Link” parameter in “Content Editor Web Parts (CEWP’s)”. Now we can easily embed code on a content page where SharePoint places it is in a lovely dedicated snippet section that is only visible when you edit the page.

    Code embed in page content
    Code embed in page content
    Embed code window
    Embed code window

    When you add any javascript SharePoint converts the “edit snippet” link as shown above to a web part where you then edit the content much like the “Content Editor Web Part”.

  • The Sign in as Different User option is missing in SharePoint 2013

    The Sign in as Different User option is missing in SharePoint 2013

    I’ve been exploring SharePoint 2013 in recent days and noticed that the ‘Sign in as Different User’ option or action from the welcome control (user menu) seems to have been removed or forgotten from the user interface in this build.

    Sign in as Different User in SharePoint 2010
    Sign in as Different User in SharePoint 2010
    No sign in as different user missing in SharePoint 2013
    No sign in as different user missing in SharePoint 2013

    For someone who works with SharePoint as I do, any kind of administration, developing or testing that requires you to sign in as another you will now become convoluted from the previous version and is somewhat frustrating and annoying. Others such as Nick Grattan have discussed this issue and possible workarounds.

    Of all the workarounds currently available such as browsing to the closeConnection page directly, modifying the welcome control and adding the control back (I do not recommend this approach), creating a javascript bookmark, embedding jQuery into the master page to insert the option back in the menu and lastly launching the browser with the RunAs option my preference will remain to browse directly to the closeConnection page:

    /_layouts/closeConnection.aspx?loginasanotheruser=true

    Or alternatively, use the javascript bookmark Cory Peters has kindly created:

    javascript:window.location.href=”http://”+window.location.host+”/_layouts/closeConnection.aspx?loginasanotheruser=true”;

    It will be interesting to see what others do and as to whether or not the option gets added back by Microsoft in a future update.