Category: PowerShell

  • Switch between modern SharePoint homepages using PnP PowerShell

    Switch between modern SharePoint homepages using PnP PowerShell

    This featured in Episode 44 of the SharePoint Dev Weekly podcast.

    I’ve been working on a modern intranet project amongst over projects for the last 12-months. This has been more about the transformation of content and business processes, rethinking information architecture and reimagining a modern intranet than it has been about custom development.

    I’ve been working on a modern intranet project amongst over projects for the last 12-months. This has been more about the transformation of content and business processes, rethinking information architecture and reimagining a modern intranet than it has been about custom development.

    We’ve recently been testing variations in the design of a homepage with different audiences. This side-by-side comparison has allowed end-user feedback, performance and accessibility testing. The same approach has also been useful for previewing and testing the capabilities of new features (like the new Yammer web part). The challenge comes when you need to promote or switch over one of these variations as the new site homepage. The homepage is the page users are directed to when first navigating to a site or clicking on the site logo. It is like as important as the index.html or default.aspx page existence to a website. Note that these variations of the homepage permit testing of content and not site configuration. To test navigation, theme or similar we have separate sites and environments for this purpose.

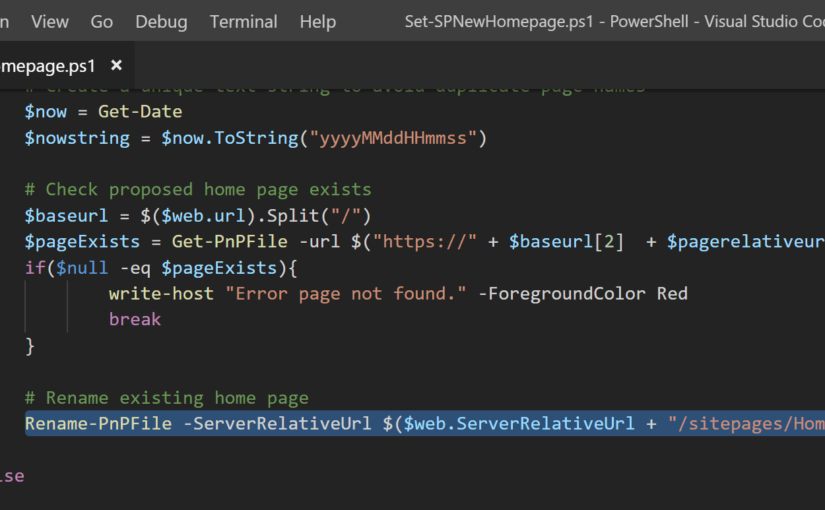
    To solve the problem switching the homepage from an existing page whilst preserving the home.aspx page name I’ve leveraged the SharePoint Pnp cmdlets to create a script that will rename or remove the current homepage (and can remove it through a toggle) and then rename an existing page to make it the new homepage.

    Set-SPNewHomePage script demonstration
    Demonstration of the Set-SPNewHomePage script in action.

    Use my PnP PowerShell script to replace the home.aspx page

    Alternative methods

    Change the default homepage through SharePoint

    Site Owners can use the out-of-the-box make homepage action to make any page the default homepage or welcome page. This is available from the toolbar in the site pages library. But this keeps the page name and means the default page is /sitepages/randompagename.aspx instead of the standard /sitepages/home.aspx that all sites have. From my perspective this is not great. Certainly, intranet-like sites should follow some basic content management principles. Call in a touch on the OCD side but consistently having a standard homepage is one of these for me.

    Screenshot of setting a new homepage in the site pages library.
    Screenshot of setting a new homepage in the site pages library.

    Change the welcome page site property through Site Settings or PowerShell

    Previously you could use the classic settings page (typically exposed by the publishing feature) or by browsing to /_layouts/15/AreaWelcomePage.aspx to make changes to the welcome page. This method no longer works and throws an error.

    As with the make homepage action describe earlier this changes the default homepage to the use the page name you have provided and means the site won’t be available if users have bookmarked the site with the page name (/sitepages/home.aspx) in the URL.

    Screenshot of the welcome page site settings page.
    Screenshot of the welcome page site settings page.

    What is my point? To this day can I still memory recall core settings pages. With these, you can quickly review or makes changes to settings pages rather than using the UI to navigate to them. This includes those that may no longer be exposed in the UI. Whilst my memory serves me well I don’t recommend this approach as these pages and settings are gradually being replaced with alternatives or removed by the SharePoint and Office 365 engineering team for a reason.

    Instead, you can also use Pnp PowerShell to change the site welcome page property. I’ve provided an example script below.

    As simple as my script is, it is the approach worth learning the most. I hope you find this article useful and as with all Pnp development effort. Sharing is caring!
  • #MSIgnite sessions available in a single spreadsheet

    #MSIgnite sessions available in a single spreadsheet

    Update (31/01/15): Session spreadsheet updated and now includes 275 sessions.

    Those involved with SharePoint, Office 365, Yammer, the communities and the wider industry will already know about the Ignite conference Microsoft has planned for May this year. Microsoft published the conference sessions on the Ignite website this afternoon, introduced through this Office Blog post.

    The Office Blog post included a video from Julia White in which she shared what to expect from the conference. She also said in the video “without giving away too much, be the first to see a lot of new technology”, hinting that we will probably see the next versions of SharePoint and Exchange etc. The SharePoint Twitter account also shared the tweet below, with another video (#InBillWeTrust) confirming the next version of SharePoint (SharePoint 2016) will be shared during the conference.

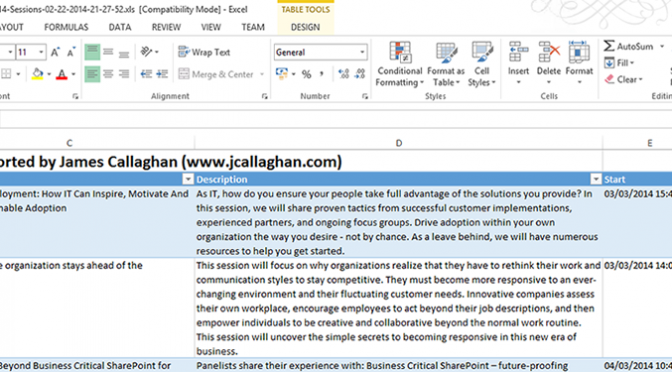
    The conference is just around the corner. At the time of writing this post, there are 272 sessions published on the website and I’m sure this will increase in the coming weeks and months. Over a year ago, I created a PowerShell script to help myself and others easily review all the sessions that were planned for the then SharePoint Conference (#SPC14).

    You’ll be pleased to know I’ve done something similar again this year, although this year I’ve quickly gone about it using jQuery. I plan to create and share a bookmarklet but until then I’ve shared the first Ignite sessions spreadsheet for your viewing. The latest version of the sessions spreadsheet and jQuery bookmarklet are shared below.

    MSIgnite Sessions Spreadsheet

    Javascript via JSFiddle

    Fingers crossed I can attend #MSIgnite and have the opportunity to meet the great people I met at #SPC14 again!

  • Working with SharePoint’s Second Stage Recycle Bin in PowerShell

    Working with SharePoint’s Second Stage Recycle Bin in PowerShell

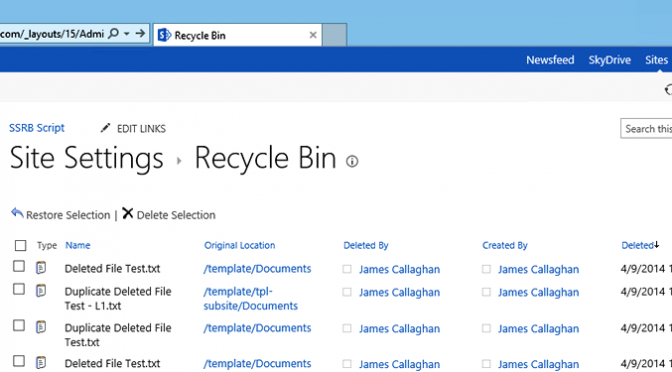
    I thought I’d share a PowerShell script that I’ve created to perform a few tasks against a Site Collection Second Stage Recycle Bin (SSRB) in SharePoint.

    Remove-SecondStageRecycleBinItems.ps1
    Remove-SecondStageRecycleBinItems.ps1

    The requirement was to delete items that were older than a set number of days from the Second Stage Recycle Bin (SSRB). A record of each item deleted also needed to be added to a report.  But SharePoint can do this already I hear you say…well yes if a Site Collection quotas and the auditing features are used. In this scenario neither could be.

    To display items in the Second State Recycle Bin in a table I used this command.

    $site.Recyclebin | where { $_.ItemState -eq "SecondStageRecycleBin" -and $_.deleteddate -le $dateDiff} | Format-Table -Property Title, Web, DeletedBy, DeletedDate -Autosize -Wrap

    Then to remove each item from the Recycle Bin I used the delete command.

    $site.Recyclebin.Delete($_.ID)

    The full script is shared below. Remember to review, rename and test this script before using it in a production environment.

    One quirk I found while creating the script was that through the web browser, SharePoint reported the time each file was deleted correctly whereas, in PowerShell, the time was not honouring GMT summer time.

    British Summer Time  in SharePoint vs. PowerShell
    British Summer Time in SharePoint vs. PowerShell

    Enjoy and delete carefully!

  • All #SPC14 sessions available in a single spreadsheet!

    All #SPC14 sessions available in a single spreadsheet!

    Update: Wednesday, 8th January 2014. This post has seen an incredible amount of traffic which I have found to be a very rewarding experience- thank you! I’ve lived up to my word and managed to export the speaker information. Both the spreadsheet and PowerShell script has been updated to include this information.

    Something I have found frustrating with the SharePoint Conference 2014 website over the holidays is that you have to browse through the sessions as search results pages. It makes planning how I want to fill my days at the conference very difficult.

    Spreadsheet containing all the SharePoint Conference 2013 sessions
    Spreadsheet containing all the SharePoint Conference 2014 sessions

    I also wanted to sit down with my colleagues to see if there are any particular sessions that interest them. Without all the sessions available in a format such as a spreadsheet this would become a very tiresome task.

    There was no way I was going to do this by hand – at this time there is about 183 published sessions and 12 pieces of information per session that would require me to use copy and paste 4392 times and click between a browser and Excel 600 times…no thank you

    Jumping the gun the a little maybe as I have yet to register (this is top of my to-do list when I’m back in the office on Monday and I’ll kick myself if this is available when you register!) but I broke out PowerShell and wrote a script to download all the information for the sessions from the SharePoint Conference (#SPC14) website to a spreadsheet – both of which you can download.

    PowerShell script to export all the #SPC14 sessions to Excel
    PowerShell script to export all the #SPC14 sessions to Excel

    A spreadsheet of all the SPC14 sessions can be downloaded with this link and the script is available here.

    By no means is this script particularly complex or elegant – but I really wanted this information in a spreadsheet and pretty fast so forgive me if it is not up to my usual standard…the key thing is I achieved what I set out to do and can share it with you all. The last piece of information which I’m still trying to export are the speakers for the sessions – I’ll update if I manage it.

    I hope you find the #SPC14 session spreadsheet helpful – see you at the conference!

  • Using PowerShell with Windows Azure

    Using PowerShell with Windows Azure

    If you’re working with Windows Azure and want to use PowerShell to perform management tasks you will first need to install and configure Windows Azure PowerShell as per this article “How to install and configure Windows Azure PowerShell“.

    1. Download and install the Microsoft Web Platform Installer
    2. Launch the Microsoft Web Platform Installer
    3. Select the Windows Azure PowerShell and then click install
    4. Launch PowerShell as an Administrator
    5. Type get-help *Azure* to see all the Windows Azure cmdlets – you will be asked to update help
    6. Download your Windows Azure subscription publish settings file by typing Get-AzurePublishSettingsFile or by browsing to the download publish profile page
    7. Save the publish settings file to a directory – in my case I store this alongside my Windows Azure scripts directory that I have synchronised with Dropbox
    8. Import the publish settings file by typing Import-AzurePublishSettingsFile <PathToPublishSettingsFiles>
    9. Check to see that you can are connected to your Windows Azure subscription by entering Get-AzureSubscription which should return information about your subscription.

    Here are a couple of useful links to get you started – Windows Azure Management Cmdlets and Windows Azure Script Centre

    That’s it – you should now be able to manage Windows Azure using PowerShell.

  • Working with Managed Paths in SharePoint using PowerShell

    Quite a common requirement for implementations of SharePoint that I am involved in is to create new managed paths for a given web application.

    While it is a simple task to perform via Central Administration, I inevitably turn to PowerShell to achieve this so that I can then include it as part of larger configuration or deployment scripts.

    Define managed paths in Central Administration
    Define managed paths in Central Administration

    To manage managed paths in SharePoint we use the PowerShell Get-SPManagedPathNew-SPManagedPath and Remove-SPManagedPath cmdlets.

    Reviewing existing managed paths

    To get a list of all the managed paths for a given web application we use the Get-SPManagedPath cmdlet as shown below.

    Get-SPManagedPaths PowerShell Cmdlet
    Get-SPManagedPaths PowerShell Cmdlet

    Creating a new explicit path

    Explicit managed paths only allow one site collection to be created at a specific path. An example of this is the root site collection of a web application which has an explicit managed path of “/” (https://sharepoint.jcallaghan.com).

    To add a new explicit managed path to a web application we use the New-SPManagedPath cmdlet and include the -Explicit parameter.

    Adding a wildcard managed path

    Wildcard managed paths allow one or more site collections to exist at a specified path. This is the same as the default ‘sites’ managed path that we should all be familiar with (https://sharepoint.jcallaghan.com/sites/projectxyz).

    To add a wildcard managed path we run the command as we did for an explicit managed path however we don’t include the -Explicit parameter.

    Custom managed paths added
    Custom managed paths added

    Removing an existing managed path

    There may be times when you need to remove managed paths. This can be done by running the Remove-SPManagedPath cmdlet and specifying the name of the managed path to be removed and what web application to remove it from. When removing a managed path you will be prompted to confirm the removal action – this can be silenced by adding -confirm:$false to the command.

    Conclusion

    Using the SPManagedPath nouns in PowerShell we can get a list of existing managed paths, create explicit or wildcard managed paths and also remove existing managed paths for a given web application.

  • Adding a Yes, No, Cancel prompt to a PowerShell script

    When I write PowerShell scripts, I often want to step through sections. This allows me to decided whether to proceed with parts of my script or not. I achieve this by using the ChoiceDescription class as demonstrated below.

    More information about using prompts in PowerShell can be found in the following article and tip on Microsoft TechNet.

  • Clear the SharePoint Quick Launch using PowerShell

    Clear the SharePoint Quick Launch using PowerShell

    Today I had a requirement to remove all the headings and links from the quick launch navigation of hundreds of SharePoint sites. The sites were being provisioned as part of a PowerShell deployment script that was deleting the default list and libraries. Going through each of these sites manually was not an option – so I edited the deployment script to include a function to remove the headings for me.

    SharePoint Quick Launch with Headings
    SharePoint Quick Launch with Headings

    I remembered doing something similar to this back on SharePoint 2007 but I didn’t have access to the previous script or project and instead had to research the subject for a while to find what I needed.

    Solution

    A post from Get-SPScripts supplied me with what I was after, although it was part of a much larger script. So I picked away at their code and made it into the following PowerShell function to re-use in other projects.

    The above Remove-SPQuickLaunchLinks function will remove all headings and links from the SharePoint quick launch for a particular site.

    Empty SharePoint Quick Launch
    Empty SharePoint Quick Launch

    Remember to review, rename and test this script before using it in a production environment.

  • Review, rename and test

    Review, rename and test

    Review

    It goes without saying…but whenever you download and use any code or script from this site, or any site for that matter, you should review and understand what the code or script is doing before you attempt to use it.

    Rename

    Using the PowerShell scripts that I share as an example. I distribute these scripts as text files as it provides an opportunity to review the script, after which you can knowingly rename the file. This also prevents any hastily or accidental execution of the script.

    Test

    And as with anything you download from the internet – you should test it in a dedicated environment prior to any production environment.